How to do - Festival Ombré Nails
Hello all,
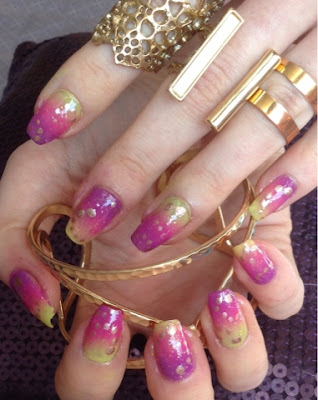
Recently I put a picture of my colorful festival inspired Ombré nails on my Instagram and Facebook page, did you see it?
I got such a good feed back from you all, I have decided to show you how to achieve this easy nail look, for you to try at home.
It's so quick to do, you have them done in less than a half an hour.
So lets Start...
Step 1. Preparation is key
A clean nail bed and good filing can really polish off the look to having great nails.
Start by lightly pushing back your cuticle's and file your nails to your desired nail shape.
I chose a square nail shape for this look, as it's the strongest shape to prevent any nail breakage.
Step 2. Apply a base coat.
Base coat is essential to all manicures, and I know most of you don't use it but what the base coat is doing, is to protect the nail from being discolored from strong pigment nail polishes. Has your nails every turned a yellowish/orange color, from using pink/purple polishes? This is why, lack of base coat girls!
I used - Essence 'the gel nail polish' base coat.
Leave to dry for 2 minutes
Step 3. Pick three festival colors.
Here is where you can get creative!
Pick you favorites or match the colors to your festival outfit.
Stroke these colors side by side onto a new makeup sponge (or Wedge)
and dab lightly onto the nail.
This will give you the ombré effect,
where you can see the three colors fade into each other.
I used
- Maybelinne super dry in 'Bubble Gum'
- SoSu by Suzanne Jackson in 'Cast a Spell'
- Essence color & go in 'L.O.L'
(Yes, it can get messy but don't worry I have you covered.)
Leave to dry for 2 minutes
Step 4. Clean up
Using the Essence nail polish corrector pen.
When dry use this product to clean up around the edges of the nail,
this pen is great for those hard to reach tiny mistakes.
Step 5. Add some sparkle & nail art.
When your ombré nails are dry, apply a glitter polish to add some sparkle.
Then leave to dry for another 2 minutes
before you get more creative with your nail art.
I used a dotting tool to add swirls of bronze dots to finish this festival design.
I used
- Essence color & go in 'Space Queen'
- Catrice 'meta light'
Leave to dry for 2 minutes.
Step 6. Finish with a Extra Shiny Top coat.
To finish this look I used two coats of Top Coat.
I love this top coat, the shin is so similar to the CND Shellac gel polish top coat.
Leave to dry for 5 minutes.
I used
- Essence gel look top coat.
There you have it your Colorful festival ombré nails.
I hope you liked this 'How to do' blog post.
Let me know if you want more quick and easy nail tutorials.


